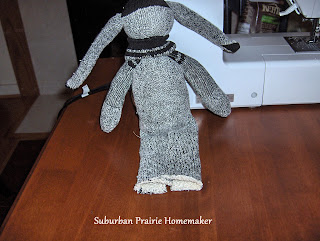
We've named him Righteous. He reminds me of a skater dude, so he needs a really cool name. I know he's faceless right now. Don't worry, I'll take care of his adorable mug later today. I wanted to get the tutorial up as soon as possible because if you are joining in on the Bonus Craftivism Challenge, you need to mail your bunny (bunnies) no later than Monday, and then you'll need to mail them Priority Mail. So let's get started!
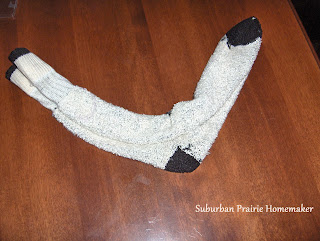
You will need one pair of size large cotton socks in at least a medium length. I used men's boot socks I found at Dollar General (2 pair/$4). I like how they looked like traditional sock monkey socks. You can use whatever socks you'd like.
You will also need a needle and thread, pins, polyester stuffing, and either a fabric marking pen (this is what I used) or a pencil, and decorations of your choice. Just remember, for The Bunny Project, if you use buttons, you must label your bun "Ages 4+".
As you put this little guy together, you'll see a lot of similarities to our glove bunny, so if you're new to sewing, this is a great "next-step" project for you.
Here is the template I used as my inspiration for my bunny. If you like to make sock monkeys or would like to learn, this is the best pattern, with the easiest instructions, I've found. Obviously, to make a bunny, we're going to do a few things differently, but you can get an idea of how this is all going to go together.
Time is short so let's get started!
Trim the cuff off one sock and save it for later. Stuff this sock up into the toe, and fill the foot portion roughly 1/3 full. Run a gathering stitch under the stuffing, starting in the center back and leaving a long starting tail. When you get all the way around, pull the starting tail and working thread to gather your sock around the stuffing. Do the criss-cross we did with the glove bunny, and tie TIGHTLY to secure. Snip threads close to your knot. This will make the little bunny head.
Now stuff the rest of the foot portion, down to the heel. Remember your bunny should be able to sit relatively well, but it should also be soft enough to hug. It's a fine line, and my best suggestion is just to play with it until you are satisfied. Add more stuffing if you need to, take some out. You be the judge.
Stitch across the bottom of the body (where the arrow is). I found this worked best by using my zipper foot on my machine. You can hand-stitch it if you'd like. Snip up the middle of the remaining portion of the sock. This will become the bunny's legs.
Turn the other sock inside out. Fold it roughly in half, like this photo. Using your marker or pencil, mark one paw. Use the template above for your guide. Be sure to mark the straight side along the fold.
Pin through all the layers to mark the paw on the other side, then flip and trace the line that the pins make. Your paws may not be exactly identical, but they will be close.
For the ears, draw a straight line down from near the center of the toe. This will give your bun a little tip of color on his/her ears. You can make your ears as long or short as you'd like. Repeat the pin and redraw procedure.
After marking, stitch on the lines either on your sewing machine or by hand. Be sure when you stitch the ears that you leave the bottom open! After the ears and paws are stitched, cut them free from the sock. Turn them right side out. Here you can see one of each right side out, and one still inside out.
Stuff the paws. Stuff the ears if desired. I chose not to. I wanted more of the floppy ear look. If you want ears that stand up and are more perky, you'll need to stuff them for stability. Now that my bunny boy is done, I think I should have put a little stuffing in the tips to help weight them down. Again, your bunny, your choice. Be creative.
And now the fun begins! Stitch the ears and arms onto your bunny. I liked sewing the ears just below that black spot on the toe. Kind of like they are sticking out from under a little hat. I also sewed the arms on a bit high so they'd be covered by that leftover cuff. Speaking of which - roll the raw edge under.
Slide the cuff over the bunny's head. It will look like a little turtleneck.
To finish up the legs, start at the bottom of one leg. Roll in just a little bit of each open side on the long edge, and whipstitch all the way around to the other "foot". Stuff each leg. Fold in the bottom edge of each foot a little bit, then run a gathering stitch around. Pull tight to close, then whipstitch over the top to help keep the opening closed. Knot thread securely, and cut thread close to knot.
Special Addition: To make the tail: cut a circle from leftover sock material. I used the inside of a canning ring as a template.
Fold the raw edges in a bit and stitch with a gathering stitch. Add a wee bit of stuffing in the center and pull tight to close. Stitch to the bunny's little bum. I stitched mine so the wrong side of the fabric of my sock (which is white and fluffy) was out. You can sew yours how you like.
So this is where you need to call on your own creativity. Obviously, this little guy needs a face. I am going to embroider it. You can do the button eyes like we did for the glove bunny. You can add clothing (please remember choking hazzards for little ones and label your bunny appropriately when shipping). You could do fabric ears. Just have a lot of fun with it! Make a bunch!
As of today, I have 5 at my house and a commitment for 1 more. I'm hoping to get 100 donated. I need your help to do this! If you could take an evening this weekend and make a bunny, and ship it out either Saturday or Monday via Priority Mail, I know the children in Harrisburg will appreciate your generosity!
Remember, the bunny goes in a plastic bag to keep it clean. Label "Ages 3 and Under" or "Ages 4+".
Ship to:
First Church of God
1520 Mchaney Road
Harrisburg, IL 62946
THANK YOU!!!


18 comments:
Glad to have you at Things I've Done Thursday!
This is so cool! I'd love for you to link this up in Mommy Solutions! So fun! http://www.crystalandcomp.com/2012/03/the-mommy-club-share-your-resources-and-solutions-37/
Crystal
That is such a cute bunny! I love the old sock monkeys so a bunny is really adorable! The backside too!!!
Thanks so much for sharing such a great tutuorial too. I'm glad you joined me for Pearls and Lace Thursday!!
Blessings, Doni
Such a cute idea with the floppy ears! I love sock creatures. pinning it, thanks!
I bet my son would love this!!
I would love for you to share this at my Flaunt It Friday link party. There are also TWO amazing giveaways this week! It closes Sunday at midnight.
http://www.dottedlinecrafts.com/2012/03/flaunt-it-friday.html
Looking forward to more posts,
Sarah@
www.dottedlinecrafts.com
What an adorable bunny and a wonderful event you have going here! Thanks for the great tutorial. :)
This is so cute! It looks like something I might actually be able to pull off. Would you share with my readers on Made for You Monday? Good luck reaching your goal, it sounds like a great cause!
Jessica
http://www.clipwithpurpose.com/easter-egg-bunny-craft-made-for-you-monday-linky/
How sweet! My mom made one years ago when I was a little girl and I loved it!
Super cute! Wish I could sew!! Thanks for linking up to A Pinteresting Party!
Sweet!
Sweet!
Thank you for linking up with me last week. Hope to see you again this Thursday :-)
Very cute! Thanks for linking up with Strut Your Stuff Saturday. We're hoping you will join us again next week with more great ideas! - The Sisters
That is awesome, Ann! I need to show this tutorial to my daughter...she loves making stuff like this! I love his name, too! Ha!
Hey, I saw that you have a SocialSpark badge on your blog. Do you do very well with that? I just signed up with them and have not yet received an "assignment" but I'm curious how well one would do with it?
Hope all is well!
Sarah
This is too cute! I would love for you to link up at my Linky Party via: http://ourdelightfulhome.blogspot.com/2012/04/show-me-what-you-got-linky-party-8.html
Mrs. Delightful
www.ourdelightfulhome.blogspot.com
So cute!! Thank you for sharing at Sharing Saturday! I hope you will share with us again this week!
SO CUTE!!! Thanks for sharing I am featuring this on today's scrappy saturday!
That is awesome! My kids would go crazy for one...maybe we will have to add this to our summer to do list. Thanks for linking up!
Post a Comment